- Property Mapping allows you to map the takeoff properties to the model properties for the entire item calculations.
- It can be used by choosing the Property Mapping button available in the Item Catalog window. This feature can be used where the dimensional properties of geometry will have multiple names.
- To nullify the global Property Mapping, a new tab Item Map Rules is added in the Item Catalog window which allows you to map the individual takeoff properties to the model properties for a particular item.
Friday, April 25, 2014
Property Mapping in Navisworks 2015
Saturday, April 19, 2014
Top five Navisworks 2015 Enhancements
Interoperability Enhancements
- Navisworks 2015 brings various improvements to model file and data integration such as better control over Revit faceting factor.
- Combines multi format data into a single model.
Quantification
- Navisworks 2015 introduces 2D takeoff.
- Efficient 3D quantification includes property mapping which allows you to work with multiple formats.
Cloud Rendering
- Navisworks 2015 introduces Autodesk 360 Cloud Rendering which allows the customers having Autodesk Cloud Service Subscription to connect and produce high resolution scene.
Autodesk Rendering Enhancements
- Navisworks 2015 includes multiple range of preset rendering settings to choose the quality and control the speed of rendering.
Reality Capture Enhancements
- Navisworks 2015 allows you to work with enhanced point cloud data integration.
- Navisworks 2015 supports better point cloud visualization
- Navisworks 2015 introduces real capture workflows with AutoCAD 3D CAD software, Revit BIM software, and Inventor 3D mechanical design software.
Friday, February 28, 2014
Working with Navisworks and BIM 360 Glue
BIM 360 is a cloud based software using which anybody can
access and share the project information. It helps in improving the
coordination and collaboration process within the team. Navisworks and BIM 360
are used for the same purpose i.e for reviewing models, navigation, and clash
detection. For example, performing a same clash test on both the software will
produce same results. You can use Navisworks and BIM 360 on your projects in
various ways:
Ø Model data can be shared with the team members.
For example, if you have appended multi-discipline models in Navisworks and
want to share with your team. Then you can use the BIM 360 add-in app to glue
the model to BIM 360.
Ø
BIM 360 can be used for collecting and managing models
from different team members and then bringing it to Navisworks.
Ø
As it can be accessed from anywhere so it is
widely used by the team members to coordinate between themselves such as
resolving clashes.
Wednesday, February 26, 2014
Saturday, February 15, 2014
Autodesk Quantity Takeoff
Cost Estimating & Quantity Surveying Software
Autodesk® Quantity Takeoff building cost estimating software makes material costing faster, easier, and more accurate. Cost estimators can create synchronized, comprehensive project views that combine important information from building information modeling (BIM) tools such as Revit® Architecture, Revit® Structure, and Revit® MEP software together with geometry, images, and data from other tools. Automatically or manually measure areas and count building components, export to Microsoft® Excel®, and publish to DWF™ format.
- Takeoff in minutes automatically—Perform a takeoff on an entire building information model (BIM) in just minutes through integration of 2D and 3D design data.
- Greater flexibility than typical databases or spreadsheets—Perform interactive examination of 3D models for material cost estimating purposes.
- Dynamic counting—Count and quantify design data quickly and easily.
- More efficient manual takeoff—Supports the takeoff of JPG, TIF, PDF, and other “nonintelligent” image formats.
- Share, query, and clarify—Generate quantities linked to specific objects. Mark up and “round-trip” your comments.
- Faster and more insightful quantity reports—Create summaries and detailed quantity surveying reports quickly and easily.
Working with multiple sheets and models
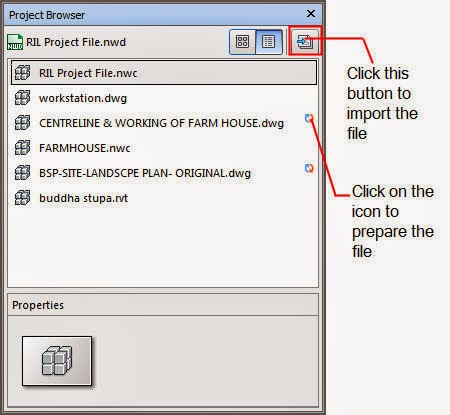
Sometimes you need to work with multiple files at a time for example the 2D sheets and 3D models, which is not an easy task. In Navisworks, Project Browser window helps you in achieving this. In the Project Browser window, you can add multiple sheets and models. This window can be accessed by choosing the Project Browser button located in the Status Bar. In the window, you will choose the Import Sheets and Models button; the Insert From File dialog box will be displayed, from where you will browse the files and add them to the window. Next, to prepare the sheets and models you need to click on the icon next to the file. Now, you can navigate to these sheets and models using the Next Sheet and Previous Sheet buttons. Figure given below shows the Project Browser window with list of files added.
Thursday, February 6, 2014
Linking Data Sources to the Model
Various data sources such as excel files, scripts, webpages, images, audio, and video files can be linked to model elements. For example, to link an excel file select the model element and choose the Add Link tool from the Item Tools > Appearance; the Add Link dialog box will be displayed. In this dialog box, specify the file name. Browse to the required excel file choosing the Browse button. Next, choose the Add button to specify the location in the model where the link will be displayed. Choose the OK button; the sheet will be linked and an icon will be displayed near the selected model element. Click on the icon to view the sheet. In the same way, you can link various data sources to the model element.

Subscribe to:
Posts (Atom)